Price Panel View Options
Brief
The article explains how to show or hide the Price panel, move it around the chart, and specify the font color of its price presentation.
Details
The Price panel can be either displayed on a chart or hidden. When it is displayed, it can be moved around the four corners of the chart.
The font color of its price presentation can also be specified.
Please note that, in Marketscope, more than one chart can be opened at a time, and you can specify whether to show or hide the Price panel
only for the current chart, the one you are working with at the moment. All other opened charts (if any) remain intact.
To show or hide the Price panel on the current chart, do one of the following:
- Right-click in the chart, and then in the menu that appears, select or clear the check box next to Show Price panel.
- Right-click in the Price panel, and then select or clear the check box next to Show Price panel.
You can choose to create new charts with the Price panel shown or hidden.
To show or hide the Price panel on all newly created charts, from the File menu, open the Options dialog box, and then,
under Chart View Options, set the Show Price panel option to Yes or No respectively.
For more information, see the Chart View Options article.
All new charts are created with the Price panel shown or hidden as it is specified in the Show Price panel option. All other already existing
charts (if any) remain intact.
The Price panel can be placed at any corner of a chart, and its location can be specified for the following:
- The current chart only.
- All already existing charts.
- All newly created charts.
To move the Price panel around the current chart
Right-click in the Price panel, and then, in the menu that appears, point to
Show Price panel location, and then, in the menu that appears, select one of the following options: Upper left, Upper right, Lower left, or Lower right.
The Price panel moves to the specified location only on the current chart, and all other charts (if any) remain intact.
To move the Price panel around all already existing charts, do the following:
- Select a location of your choice in the current chart as it is explained above or move to the chart with the required location of the
Price panel.
- Right-click in the Price panel, point to Show Price panel location, and then, in the menu that appears, click Apply To All.
- In the Confirmation dialog box that appears, click OK.
The Price panel moves to the selected location on all already existing charts.
Note: To avoid the Confirmation dialog box in the future, when it appears, select the Don't ask again check box. The
step works for all charts opened at the moment. You can also deactivate the Confirmation dialog box with the help of the
Options dialog box by setting the Show the Confirmation dialog box when moving the Price panels option of Chart View Options to
False. Setting the option to True reactivates the Confirmation dialog box. For more information, see the
Chart View Options article.
To select the Price panel location for all newly created charts, do one of the following:
- Move the Price panel with the help of this procedure:
- Select a location of your choice in the current chart as it is explained above or move to the chart with the required location of
the Price panel.
- Right-click in the Price panel, point to Show Price panel location, and then, in the menu that appears, click Apply To All.
- In the Confirmation dialog box that appears, click OK.
In all newly created charts, the Price panel appears in the selected location, and all other already existing charts remain intact.
Note: To avoid the Confirmation dialog box in the future, when it appears, select the Don't ask again check box. The
step works for all charts opened at the moment. You can also deactivate the Confirmation dialog box with the help of the
Options dialog box by setting the Show the Confirmation dialog box when moving the Price panels option of Chart View Options to
False. Setting the option to True reactivates the Confirmation dialog box. For more information, see the
Chart View Options article.
- To move the Price panel with the help of the Options dialog box
- Do one of the following:
- On the File menu, click Options.
- Right-click in the chart, and then, in the menu that appears, click Options.
- The Options dialog box appears.
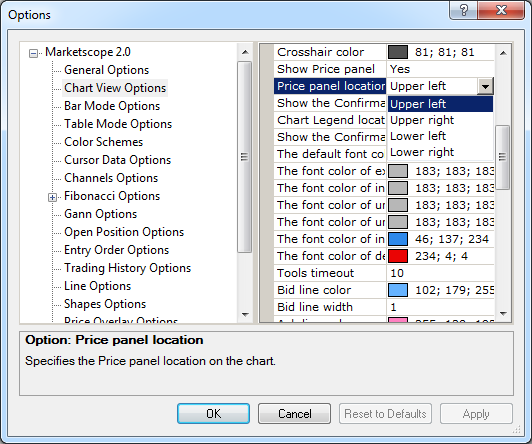
- In the left-hand panel, under Marketscope, click Chart View Options.
- In the right-hand panel, set the Price panel location option to a value of your choice: Upper left, Upper right,
Lower left, or Lower right.
- Click OK.
In all newly created charts, the Price panel appears in the selected location, and all other already existing charts remain intact.
Depending on the type of the price displayed in the Price panel at the given moment, the font color of the price values may vary.
To select the font color of the panel price values
Repeat steps 1 through 3 from the previous procedure, and then, in the right-hand panel, select a color of
your choice from the color palettes of appropriate options of the Price panel rate values.
For more information, see the Chart View Options article.
back