Create Entry/Range Entry Order
Brief
This section describes all possible ways of creating an entry and range entry orders.
Details
To create an entry or range entry order
- Do one of the following:
- On the toolbar, click Entry.
- In the Dealing Rates window,
right-click the appropriate symbol, and then click Create Entry Order.
- In the Orders window, right-click an entry order or the title of the entry orders area, and then click Create Entry Order.
- On the Trading menu, point to Dealing Rates or Orders, and
then click Create Entry Order.
- Press SHIFT + E.
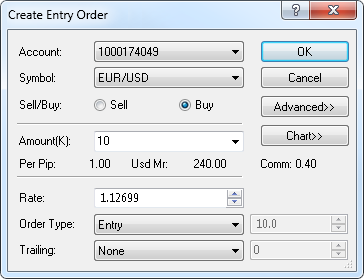
- The Create Entry Order dialog box appears.
To view a five minute chart for the symbol shown in the Symbol box, click Chart.*
On the chart, you can see a line on the level of the order price. You can change the order price by dragging its line to the level of your choice.
- In the Account box, click the account you are going to trade on
if you are trading on more than one account.
- In the Symbol box, click the symbol of your choice if necessary.
- To choose the trade operation, click Sell or Buy.
- In the Amount (K) box, select or type the amount.
The cost of one pip price movement and necessary margin for the specified amount are shown in Per Pip and Usd Mr respectively.
The total amount of the commission to be charged for opening and closing the position is shown in Comm.
Note: Depending on the version of your trading station, you can see the Currency/Point box instead of the Amount (K) box in this dialog box.
If necessary, you can change the Amount mode in Options. For details, see Change Amount Mode.
- In the Order Type box, click the type of the order if necessary.
- In the case of the Entry order, in the Rate box, select or type the entry order price if necessary.
- In the case of the Range Entry order, in the Rate box, select or type the stop price if necessary.
In the box right to the Order Type box, select or type the distance between the stop and limit prices in pips.
- If you have trailing entry orders enabled, to make your entry order trailing, in the Trailing box, click the step type of your choice.
If you choose a fixed step trailing order, select or type the step in pips in the next box.
Note: To enable trailing entry orders, in Options set the option Trailing entry orders enabled under General Trading to Yes.
- To change the order Time In Force, click Advanced, and then select the Time-In-Force option of your choice. If you select GTD (Good Till Date), in the
date box on the right, select or type the expiration date of the order. By default, the expiration date is the end date of the current trading date.
- To add a stop and/or limit order to the entry order, click Advanced,
and then specify your stop or limit prices by selecting the appropriate check boxes and specifying the rate directly or in pips.
You can also make your stop order trailing by specifying the trailing step.
On the chart, lines on the price levels of these orders appear.
You can change their prices by dragging the lines to the levels of your choice.
- Click OK.
Once the entry or range entry order is created, it appears in the Orders window. If you also created stop/limit orders, their prices are shown for the order in the Stop and Limit columns.
Once the entry or range entry order is executed, the stop/limit orders become active, they are displayed as a Stop/Limit group and can be changed like ordinary
entry orders.
* If Marketscope 2.0 is not installed on your computer, there is no Chart button in the dialog box, and the chart is unavailable.
back