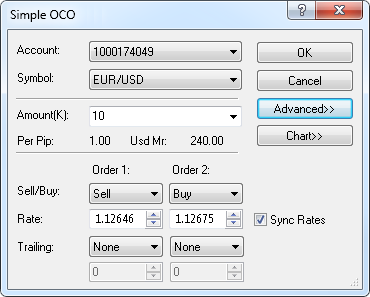
Simple OCO Dialog Box

Using this dialog box you can create a simple OCO order.
- Account: displays the number of the account on which the OCO order will be created.
If you have more than one account, you can choose the account by clicking the account number in this box.
- Symbol: displays the symbol for which the OCO order will be created. To change the symbol, click the symbol of your choice in this box.
- Amount (K): displays the amount of the OCO order. To change the amount, select or type your amount in this box.
Note: Depending on the version of your trading station, you can see the Currency/Point box instead of the Amount (K) box in this dialog box.
If necessary, you can change the Amount mode in Options. For details, see Change Amount Mode.
- Per Pip: displays the cost of one pip price movement for the specified order amount.
- Usd Mr: displays the margin necessary to open a position for the specified order amount.
- Order 1 and Order 2: display the parameters for each of the entry orders in the OCO order.
- Sell/Buy: displays the trade operations of each entry order of the OCO order.
To change the trade operations, click Sell or Buy in the appropriate boxes.
- Rate: displays the prices at which entry orders of the OCO order will be created.
To choose the prices, select or type your prices in the appropriate boxes.
- Sync Rates: if you select this check box, when you change the price of one of the entry orders,
the price of the other order will also change by the same number of pips to keep the difference between the prices.
- Trailing: You will see this box if you have trailing entry orders enabled.
If you select a value other than None, this will make either of the entry orders trailing.
If you choose the value Fixed, select or type the step in pips in the next box.
Note: To enable trailing entry orders, in Options set the option Trailing entry orders enabled under General Trading to Yes.
- Advanced: if you click this button, you will be able to change the orders Time In Force and add stop/limit orders to the entry orders.
- Time In Force: displays the orders Time In Force. To change it, click the necessary option in this box.
- Order 1 and Order 2 areas: display information about stop/limit orders of entry order 1 and entry order 2 respectively.
- Stop: if you select this check box, a stop order will be created for the appropriate entry order
at the specified price or distance in pips from the price at which the OCO order will be executed.
To change the stop price, select or type your price in the appropriate box.
To specify the stop and limit prices through distances in pips, select the In pips check box.
- Trailing: if you select a value other than None, this will make your stop order a trailing stop.
If you choose the value Fixed, select or type the step in pips in the next box.
- Limit: if you select this check box, a limit order will be created for the appropriate entry order
at the specified price or distance in pips from the price at which the OCO order will be executed.
To change the limit price, select or type your price in the appropriate box.
To specify the stop and limit prices through distances in pips, select the In pips check box.
- In pips: if you select this check box, this will enable you to specify prices for the stop/limit orders
in distances in pips from the price at which the OCO order will be executed.
- Chart:* if you click this button, you will see a five minute chart for the symbol shown in the Symbol box.
On the chart, you will see two lines on the levels of the order prices. You can change the order prices by dragging their lines to the necessary levels.
If you add stop/limit orders to the OCO order, lines on the price levels of these orders will appear. You can change their prices by dragging the lines to the necessary levels.
* If Marketscope is not installed on your computer, there is no Chart button in the dialog box, and the chart is unavailable.
back

